HTTP Request
Use HTTP Request when the agent needs to send or fetch structured data from an external system during the conversation.
For the Consultation Desk example, this is optional. Add it only after the core routing flow already works and you can name the exact external action the agent should take.
Typical examples:
- Create a callback lead in a CRM after the user agrees to follow-up
- Check appointment availability from a scheduling endpoint
- Send confirmed intake details to an internal workflow
When HTTP Request Is the Right Tool
Use it when:
- An external system already exposes a stable HTTPS endpoint
- The agent needs a structured request or response, not a free-form search
- You can explain exactly when the request should run
Do not use it when:
- The same information should live in
Knowledge Base - The integration contract is still unclear
- A human should review the action before anything is sent
Step 1: Decide the Single Business Action
Start with one narrowly defined action.
Good examples:
Create Callback LeadCheck Appointment Availability
Weak example:
CRM Integration
One tool per action is usually easier to debug than one generic request that tries to do too much.
Step 2: Add HTTP Request
In Editor, open Tools, click Add Tool, and choose HTTP Request.
Use the display name to describe the business outcome, not the transport detail. A clear name helps the operator understand what the tool is for when they review the configuration later.
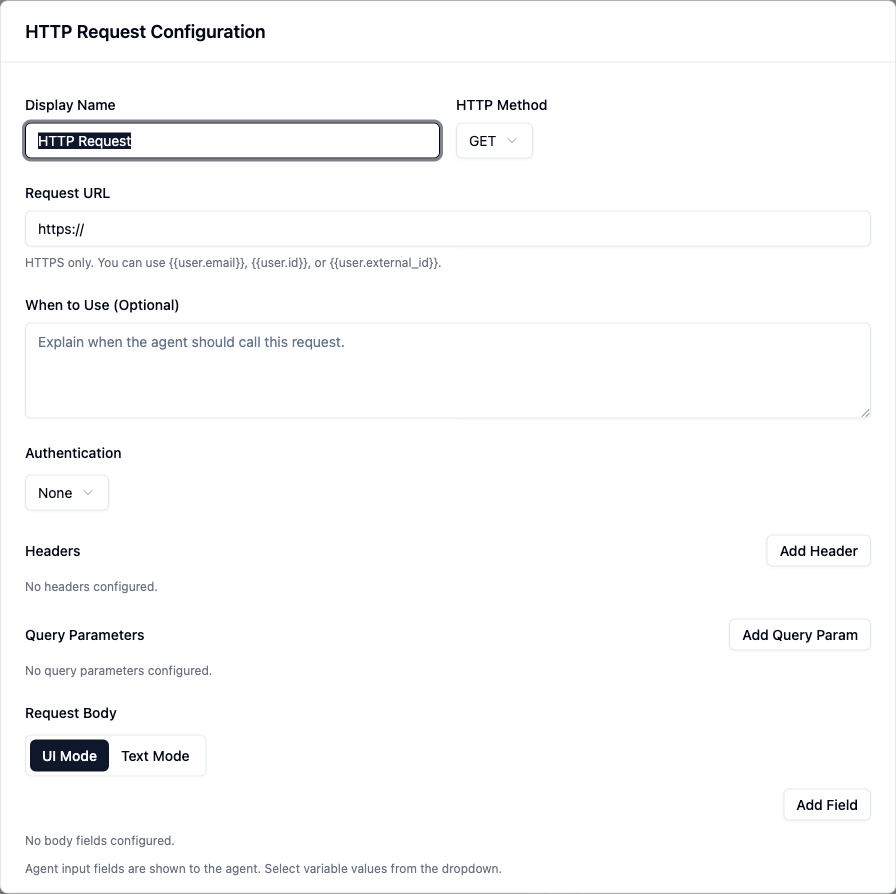
Step 3: Configure Method and URL
Set the HTTP Method and Request URL first.
- The URL must use
https:// - If the endpoint needs user identity in the URL, the field supports
{{user.email}},{{user.id}}, and{{user.external_id}}
Keep the endpoint specific. If the agent is creating a callback lead, point it at that exact callback endpoint instead of a general-purpose API path.
Step 4: Add Only the Auth and Payload You Need
Then configure the request details the endpoint actually requires:
AuthenticationHeadersQuery ParametersRequest BodyinUI ModeorText Mode
Keep the payload small. If the downstream system does not need a field, do not send it just because it is available in the conversation.
Step 5: Write a Narrow When to Use
The trigger rule matters as much as the payload.
Example:
Use this request only after the user agrees to a human callback and you have collected their preferred contact details. Send the callback request to the CRM so the operations team can follow up.
That works because it defines:
- The exact stage of the conversation
- The data that should already be available
- The reason the external call exists
Step 6: Test a Happy Path and a Non-Trigger Path
Test a prompt that should trigger the request:
Yes, please arrange a callback tomorrow afternoon.
Also test a prompt that should not trigger it:
I am still comparing options.
Then confirm:
- The request happens only on the intended path
- The payload contains the fields you expected
- The agent does not send data before the user has actually committed to the next step
Operator Tips
- Prefer one small request per business job.
- Name the tool after the action, not after the API vendor.
- Keep
When to Useand the request body aligned. If the trigger says “after callback agreement,” the payload should assume that stage. - If the action is irreversible or high-stakes, keep a human approval step in the process instead of firing the request too early.
Common Mistakes
Using HTTP Request as a generic escape hatch
This creates fragile behavior fast. Each request should have a clear purpose and contract.
Sending data before the workflow is actually ready
If the user is still exploring, do not call an external system yet.
Packing the request with every possible field
More fields do not make the integration smarter. They usually make debugging harder.